
Recipe Details
Manaqeesh (Za’atar Flatbreads)
By Reem Kassis
Published on October 20, 2021
Recipe Overview
Total Time: 2½ hours (including fermentation and baking)
Servings: 6–8 flatbreads
Difficulty: Moderate
Rating: 4.0/5 (based on 159 ratings)
Comments: 15 comments
Cultural Context & Description
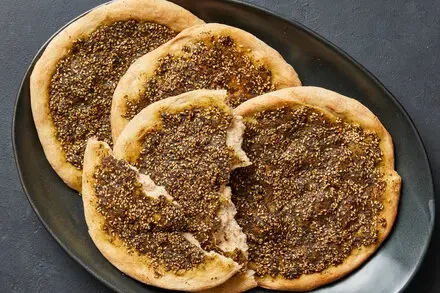
Manaqeesh are a cornerstone of Levantine cuisine, celebrated across Arab households for their fluffy, herbaceous crust and versatile toppings. Hailing from Palestinian, Lebanese, Syrian, and Jordanian culinary traditions, these flatbreads traditionally shine as a breakfast staple, though their appeal extends to any mealtime—from brunch to dinner. While modern variations feature innovative toppings like cheese, labneh, or sweet spreads, the classic za’atar mixture remains the gold standard, balancing earthy spices with the richness of olive oil. The texture, achieved through hand-stretching rather than rolling, ensures a soft interior and crisp exterior, making each bite a harmonious blend of aroma and texture.
Ingredients
For the Dough
500g (3½ cups) high-gluten flour (bread flour, for elasticity)
7g (1¼ tsp) active dry yeast
100ml (⅓ cup + 1 tbsp) warm water (40–45°C/104–113°F)
200ml (⅔ cup + 1 tbsp) cold water
10g (1 tsp) fine sea salt
10g (1 tbsp) olive oil (for kneading)
For the Za’atar Topping
3 tbsp za’atar spice blend (traditional mix: 2 tbsp ground dried oregano, 1 tbsp toasted sesame seeds, ½ tbsp sumac, ½ tbsp dried thyme, pinch of salt; adjust to taste)
2 tbsp extra-virgin olive oil (for binding the spice mix)
Step-by-Step Preparation
1. Activate the Yeast
In a small bowl, combine the yeast, warm water, and 1 tsp sugar (optional, to feed the yeast). Stir gently and let sit in a warm, draft-free spot for 5–7 minutes until foamy. This confirms the yeast is active and ready to ferment.
2. Prepare the Dough
In a large mixing bowl, whisk together the high-gluten flour and salt. Create a well in the center, then add the activated yeast mixture, cold water, and olive oil. Use a dough scraper or wooden spoon to combine the ingredients, gradually incorporating flour from the edges into the wet center.
Once partially combined, knead the dough by hand on a floured surface for 8–10 minutes until smooth, elastic, and slightly tacky (the "windowpane test": stretch a small piece until it forms a thin, transparent sheet without tearing). If the dough is too dry, add 1–2 tbsp water; if too sticky, dust with a touch more flour.
3. First Fermentation
Transfer the kneaded dough to a lightly oiled bowl, turning to coat all surfaces. Cover with a clean kitchen towel or plastic wrap and let ferment in a warm (25–27°C/77–81°F), humid environment for 1–1.5 hours, or until the dough doubles in volume. To test doneness: press a finger into the dough—if the indentation slowly springs back, fermentation is complete.
4. Shape and Second Fermentation
Punch down the dough to release excess gas, then divide it into 6–8 equal portions (≈150–180g each). Use a bench scraper to separate the dough, then round each portion into a smooth ball. Let the balls rest on a floured surface for 15 minutes, covered loosely with a towel.
For the traditional hand-stretched technique: Take one dough ball and place it on a lightly floured surface. Using both hands, gently press the center with your thumbs, then slowly pull outward with your fingers, rotating the dough as you stretch. Continue until the dough forms a thin, even circle (≈25cm/10 inches in diameter) with a slightly thicker edge. Aim for small, intentional tears in the surface—these will create air pockets for fluffiness. Repeat with remaining portions.
5. Prepare the Topping and Assemble
Mix the za’atar blend with 2 tbsp olive oil in a small bowl until smooth (the oil helps the spice adhere to the dough).
Preheat your oven to 220°C/425°F with a rack positioned in the lower-middle. Line a baking sheet with parchment paper and lightly grease it.
6. Bake the Flatbreads
Transfer each stretched dough circle to the prepared baking sheet, leaving 10–15cm (4–6 inches) between them. Brush or sprinkle the za’atar mixture evenly over the center of each flatbread, leaving a small border for the crust.
Let the dough rest (second fermentation) for 15–20 minutes, covered loosely, to allow the yeast to work again and the dough to puff slightly.
Bake for 10–12 minutes, rotating the sheet halfway through, until the flatbreads are golden brown, puffed, and the edges are crisp. The internal temperature should reach 95°C/203°F for safety, but visual cues (a slightly puffed, airy surface) are often enough.
7. Serve and Enjoy
Remove the flatbreads from the oven and let cool for 5 minutes. Serve warm with a side of labneh (strained yogurt), pickled vegetables, or a drizzle of extra virgin olive oil. The traditional za’atar version pairs beautifully with a simple dip of crushed garlic and lemon, or enjoy it solo as a savory snack.
Tips for Success
Fermentation: Use a proofing box or microwave (with a bowl of hot water inside) for consistent temperature control, as yeast struggles in extreme heat or cold.
Hand-Stretching: For even thickness, start with a "star" shape by gently stretching outward from the center, then rotate and pull until the desired size is reached. Avoid over-stretching, which can cause the dough to crack.
Topping Variations: Experiment with modern twists, such as sprinkling shredded halloumi or feta before baking, or adding a cracked egg yolk for a runny center (baked 5 minutes longer to set the egg).
Featured in: The Best Olive Oil in the World? This Village Thinks So.
Note: The 2½-hour total time includes both fermentation phases. Adjust timing based on your kitchen’s ambient temperature—longer fermentation may yield a more complex flavor, while shorter fermentation keeps the process quicker.
This recipe honors the Manaqeesh’s heritage while offering practical techniques for achieving authentic, restaurant-quality results at home.