
Recipe Details
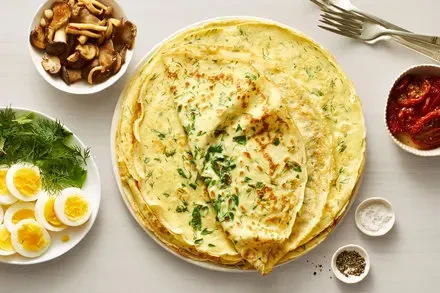
Classic Crepe Recipe: Flexible & Adaptable
From Tamar Adler, NYT Cooking
Introduction
This crepe recipe is intentionally unit-free, designed to adapt to your kitchen vessels (e.g., a pint glass feeds 4). Use your preferred tools—an au lait bowl, Champagne coupe, or coffee urn—and adjust quantities to suit your needs. The key is balance: a smooth batter, controlled heat, and patience yield delicate, even crepes.
Ingredients (Flexible Ratio)
For 4 servings (adjust based on appetite):
1 egg (per person, or 2–3 for a richer batter)
1/2 cup liquid (milk, cream, half-and-half, or beer; substitute with non-dairy milk for dietary needs)
1/3 cup flour (all-purpose, whole wheat, or half-all-purpose + half-almond flour for a nutty twist)
Pinch of salt (adjust to taste; savory versions may use 1/8 tsp dashi powder)
Optional flavor boosters: 1 tsp grated nutmeg, 1 tbsp dark maple syrup, or 1 tbsp coconut sugar (for sweet crepes); 1 tbsp yogurt or 2 tbsp crème fraîche (for tangy, savory options).
Step-by-Step Preparation
1. Prepare the Batter
Beat the eggs: Crack eggs into a bowl and whisk until smooth.
Add flour to avoid lumps: Gently whisk in flour to the eggs, then gradually incorporate the liquid (milk/cream/beverage) and any flavor boosters. Whisk vigorously for 1–2 minutes until the batter is smooth and lump-free.
Season with salt: Taste the batter; if raw egg flavor is noticeable, heat a small pan over medium heat, drizzle 1–2 tbsp batter, cook until golden, and taste to adjust salt or flavor.
Rest the batter (optional but recommended): Let the batter rest at room temperature for 10 minutes, or refrigerate for 30 minutes to refine texture and reduce tearing during cooking.
2. Cook the Crepes
Heat the pan: Use a nonstick pan or lightly oil a stainless steel pan with vegetable oil or butter. Heat over medium heat until shimmering (about 2–3 minutes).
Coat the pan: Pour a ladleful of batter into the pan, tilting it to spread thinly and evenly cover the bottom. The batter should form a thin, transparent layer.
Cook the first side: Let the crepe cook undisturbed for 30–45 seconds until edges begin to brown and the center sets.
Flip carefully: Use a spatula to lift the edge; the crepe should release easily. Flip it and cook the second side for 10–15 seconds (edges will crisp slightly).
Stack crepes: Transfer cooked crepes to a plate, cover with a clean cloth towel to keep warm and prevent drying.
3. Storage & Serving
Leftover batter: Store in an airtight container in the refrigerator for up to 2 days. Add a splash of milk before reheating.
Serve immediately: Fill crepes with sweet or savory fillings (see suggestions below) and enjoy warm.
Pro Tips from Expert Chefs & Home Cooks
Avoid Common Pitfalls
No lumps: Whisk eggs first, then slowly add flour to avoid clumps.
Thin, even layers: Pour batter into the pan, tilt, and swirl to spread evenly. If too thick, dilute with a splash of liquid.
Controlled flipping: Crepes are sturdy once set; flip gently with a spatula.
Flavor & Texture Enhancements
Rest for tenderness: Let batter rest 10–30 minutes (refrigerated for longer) to develop gluten and create delicate crepes.
Oil or butter: For nonstick pans, use oil; for stainless steel, butter adds richness (and the "sizzle" of golden edges).
Salt experimentation: Savory crepes benefit from 1/8 tsp sea salt or 1 tbsp dashi powder; sweet versions use 1/4 tsp dark brown sugar.
Sweet & Savory Fillings
Sweet: Cottage cheese + lemon zest jam (Suzy), fresh berries + maple syrup, or dark chocolate ganache.
Savory: Leftover cranberry sauce + Comté cheese (Annie Ramsay), scrambled eggs + chives, or smoked salmon with crème fraîche.
Notes on Adaptation
Flour substitutions: Gluten-free flours work (1:1 with rice flour + xanthan gum); whole wheat adds nuttiness.
Liquid swaps: Beer or sparkling water lightens the batter; coconut milk adds creaminess.
Gluten-free option: Use 1/3 cup gluten-free flour blend, 1/2 cup coconut milk, and 1 egg.
Cook with intention—patience and balance are your allies.
— Tamar Adler
User Ratings: 5/5 (1,636 reviews)
Private notes and comments available on NYT Cooking